I know Easter was last week, but the kids are still off school, which means the roads are practically empty – bliss!!! Because most people tend to go to see family over Easter my work’s social club decided to hold a children’s Easter treasure hunt the weekend after so more parents and children would be around. I rather stupidly volunteered to help at this event and then suddenly it was “ask Sophia, it’s her event, she’s co-ordinating”!!!!!!!! I won’t lie, I was not impressed that it went from me just helping out to having to buy everything and getting asked to OK every bit of paperwork that went with it; next time I’m putting my foot down & saying in no uncertain terms that if I didn’t say I’ll co-ordinate, I WON’T….
Aaaaanyway… I thought the kids will probably have lots of Easter eggs from various adoring family members, so I wanted to give them something else. I had seen a few animals made from Stampin’UP! curvy keepsake boxes & I thought I would give making rabbits/Easter Bunnies a go. Below is a step-by-step tutorial on how I made them; feel free to try them yourself, just say where you got your inspiration from!!
You will need: White card, pink card, a black pen, a pink pen, glue, white pom poms, Curvy keepsake box die, Stampin’UP! Small Oval punch, SU! Large Oval punch.
Die-cut the Curvy Keepsake box templates, attach two templates as detailed in product instructions (I usually use double sided tape). Using a bone folder, curve the sides of the box & assemble. Using the punches punch out two large ovals from white card and two small ovals from pink card.
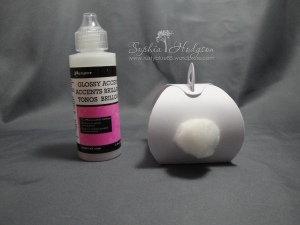
Using a generous blob of glossy accents, attach a white pom pom to the back of box – hold in place for a few seconds to allow the glossy accents to really grab the pom pom.
Take the white ovals and bend over one edge, creating mirror images – these will be the rabbit’s ears and the small bit that has been bent over will be the base to glue the ears to the box. Once you are happy with the ears, use glue to attach the small pink oval towards the bent-over section, so they will be at the base of the ear when it is attached.
Using Glossy Accents again attach the ears to the front of the box, if you need you can move them around until you are happy with the position, then hold in place for the Glossy Accents to grab.
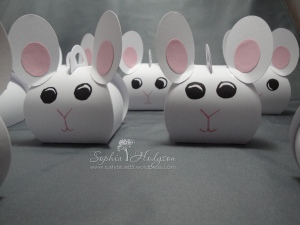
You should now have something that almost resembles a bunny (maybe slightly more like a Chinchilla than a bunny, but near enough!). I used Tim Holtz Distress Marker in ‘Spun Sugar’ (but I’m sure you could use any kind of pen) to draw the nose and mouth – rabbits have a Y-shaped nose & almost a mini smile on their lips. I drew the eyes with a thick black pen because it was a big area to colour (in hindsight this was a bad idea because on many of these bunnies one eye is bigger than the other and/or one eye is higher than the other… oops!).
So now the bunnies have faces, there is only one thing left to draw – their big back legs!
Hey-presto! Easter Bunnies! I filled them with Galaxy Minstrels, but you could use any small treats/Mini Eggs (maybe don’t put in things that might melt & make a mess, or anything that might cause oil stains on the cardboard).
I hope you enjoy the rest of your weekend x x


These are very cute you did a fabulous job.
Thank you! They were therapeutic to make & the children LOVED them & all gave me hugs for making them! It was a heartwarming moment & I felt like a Scrooge for all the complaining I had done earlier!